Thursday, 9 June 2016

C development on Linux - Coding style and recommendations - IX.

1. Translations

2. Introduction

You may wonder what is meant by the title. Code is code, right? It's important to be bug-free and that's that, what else? Development is more than writing code and testing/debugging it. Imagine you have to read someone else's work, and I suppose you already done that, and all the variables are named foo, bar, baz, var, etc. And the code isn't commented nor documented. You will probably feel the sudden urge to invoke unknown gods, then go to the local pub and drown your sorrows. They say that you should not do unto others what you don't want done unto you, so this part will focus of general coding guidelines, plus GNU-specific ideas that will help you have your code accepted. You are supposed to have read and understood the previous parts of this series, as well as solve all the exercises and, preferably, read and wrote as much code as possible.

3. Recommendations

Before starting, please take note of the actual meaning of the word above. I don't, in any way, want to tell you how to write your code, nor am I inventing these recommendations. These are the result of years of work by experienced programmers, and many will not just apply to C, but to other languages, interpreted or compiled.
I guess the first rule I want to stress out is: comment your code, then check if you commented enough, then comment some more. This is not beneficial for others that will read/use your code, but also for you. Be convinced that you will not remember what exactly you meant to write after two or three months, nor will you know what int ghrqa34; was supposed to mean, if anything. Good developers comment (almost) every line of their code as thoroughly as possible, and the payoff is more than you might realize at first, despite the increased time it takes to write the program. Another advantage is that by commenting, because this is how our brain works, whatever we wished to do will be better remembered, so again you won't look at your code, fast-forward a few months, wondering who wrote your code. Or why.
The C parser doesn't really care how ordered your code is. That means you can write a typical "Hello, world" program like this, and it would still compile:
#include <stdio.h> int main(){printf("Hello, world!"); return 0;}
It seems much more readable the way we wrote it the first time, doesn't it? The general rules regarding formatting are: one instruction per line , choose your tab width and be consistent with it, but make sure that it complies with the project's guidelines, if you're working on one, also make liberal use of blank lines, for delimiting various parts of the program, together with comments, and finally, although this is not necessarily coding style-related, before you start coding seriously, find an editor you like and learn to use it well. We will soon publish an article on editors, but until then Google will help you with some alternatives. If you hear people on forums, mailing lists, etc. saying "editor x sucks, editor y FTW!", ignore them. This is a very subjective matter and what's good for me might not be so good for you, so at least try some of the editors available for Linux for a few days each before even starting to try creating some opinion.
Be consistent in variable naming. Also make sure the names fit with the others, so there is harmony within the entire program. This applies even if you're the only author of the software, it will be easier to maintain later. Create a list of used prefixes and suffixes (e.g. max, min, get, set, is, cnt) and go with them, unless asked otherwise. Consistency is the key word here.

3.1. GNU-specific guidelines

What follows is a summary of the GNU coding standards , because we know you don't like to read such things. So if you're writing code that would like to fit into the GNU ecosystem, this is the document to read. Even if you don't, it's still a good read on how to write proper code.
This document is always worth a read in it's entirety if you are creating or maintaining GNU software, but you will find the most important parts below. One first issue worth mentioning is how to deal with function prototypes. Please go back to the part dealing with that if you have any issues. The idea is "if you have your own functions, use a prototype declaration before main(), then define the function when needed." Here's an example:
#include <stdio.h>

int func (int, int)

int main() 

[...]

int func (int x, int z)

[...]
Use proper and constant indentation. This cannot be emphasized enough. Experienced programmers with years and years of code behind will take it very badly when you submit code with improper indentation. In our case, the best way to get used to how GNU does this is by using GNU Emacs (although this is not in any form our way to tell you that "GNU Emacs is good for you, use it.", as we're proponents of free will and choice), where the default behaviour for C code is indentation set at two spaces and braces on a line for themselves. Which brings us to another important issue. Some people use braces like this:
while (var == 1) {
  code...
}
...while others, including GNU people, do it like this:
while (var == 1)
{
  code...
}
Of course, this also applies to conditional expressions, functions and every occasion where you need to use braces in C code. As far as noticed, this choice is something very GNU-specific, and how much of this you respect depends solely on your taste and stance on the issue.
Our next issue is a technical one, and a promise I had to keep: the malloc() issue. Besides writing pertinent and meaningful error messages, unlike the ones we've all seen in other operating systems, check that malloc() and friends always return zero. These are very serious issues, and you'll get a few words lesson about malloc() and when to use it. By now you know what allocating memory automatically or statically is. But these methods don't cover all bases. When you need to allocate memory and have more control over the operation, there's malloc() and friends, for dynamic allocation. Its' purpose is to allocate available memory from the heap, then the program uses the memory via a pointer that malloc() returns, then said memory must be free()d. And "must" is to be written with capitals in 2 feet letters with a burning red color. That's about it with malloc(), and the reasons have already been exposed earlier in the previous part.
You are urged to use a consistent interface in all your command-line programs. If you're already a seasoned GNU/Linux user you have noticed that almost all programs have --version and --help, plus, for example, -v for verbose, if such is the case. We'll not get into all of it here; grab a copy of the GNU Coding Standards, you will need it anyway.
Although I personally tend to overlook this, and to many it's a minor issue, it will improve the readability of your code, because, again, that's how our brain works. The idea is: when you're in doubt about using spaces, use them. For example:
int func (var1, var2);

int func(var1,var2);
There are some that say you can't avoid nested ifs. There are others that say "why avoid nested ifs?" And there are yet others that simply do not use nested ifs. You will create your own opinion on this as time passes and lines of code you write increase. The idea is, if you use them, make them as readable as humanly possible, as they easily can lead to almost-spaghetti code, hard to read and to maintain. And again, use comments.
The GNU coding standard say that it's good to have your code be as portable as can be, "but not paramount". Portable hardware-wise? That depends on the program's purpose and what machines you have at your disposal. We are referring more to the software side, namely portability between Unix systems, open source or not. Avoid ifdefs if you can, avoid assumptions regarding file locations (e.g. Solaris installs third-party software under /opt, while BSD and GNU/Linux do not), and generally aim for clean code. Speaking of assumptions, do not even assume that a byte is eight bits or that a CPU's address space must be an even number.
Documenting your code, in form of manual pages and well-written READMEs and so on, is another paramount aspect of software development. Yes, it IS a tedious task, but if you don't have a documentation writer on your team, it's your responsibility to do it, as every good programmer does his/her job from A to Z.

4. Conclusion

Next time we'll continue from where we left off here: going from idea to a complete program, with Makefiles, documentation, release cycles and all the fun stuff.

C development on Linux - Building a program - X

1. Introduction

After all that theory and talking, let's start by building the code written through the last nine parts of this series. This part of our series might actually serve you even if you learned C someplace else, or if you think your practical side of C development needs a little strength. We will see how to install necessary software, what said software does and, most important, how to transform your code into zeros and ones. Before we begin, you might want to take a look at our most recent articles about how to customize your development environment:
  • Introduction to VIM editor
  • Introduction to Emacs
  • Customizing VIM for development
  • Customizing Emacs for development

2. Building your program

Remember the first part of our C Development series? There we outlined the basic process that takes place when you compile your program. But unless you work in compiler development or some other really low level stuff, you won't be interested how many JMP instructions the generated assembler file has, if any. You will only want to know how to be as efficient as possible. This is what this part of the article is all about, but we are only scratching the surface, because of the extensiveness of the subject. But an entry-level C programmer will know after reading this everything needed to work efficiently.

2.1. The tools

Besides knowing exactly what you want to achieve, you need to be familiar with the tools to achieve what you want. And there is a lot more to Linux development tools than gcc, although it alone would be enough to compile programs, but it would be a tedious task as the size of your project increases. This is why other instruments have been created, and we'll see here what they are and how to get them. I already more than suggested you read the gcc manual, so I will only presume that you did.

2.1.1. make

Imagine you have a multi-file project, with lots of source files, the works. Now imagine that you have to modify one file (something minor) and add some code to another source file. It would be painful to rebuild all the project because of that. Here's why make was created: based on file timestamps, it detects which files need to be rebuilt in order to get to the desired results (executables, object files...), namedtargets. If the concept still looks murky, don't worry: after explaining a makefile and the general concepts, it will all seem easier, although advanced make concepts can be headache-inducing.
make has this exact name on all platforms I worked on, that being quite a lot of Linux distros, *BSD and Solaris. So regardless of what package manager you're using (if any), be it apt*, yum, zypper, pacman or emerge, just use the respective install command and make as an argument and that's it. Another approach would be, on distros with package managers that have group support, to install the whole C/C++ development group/pattern. Speaking of languages, I wanted to debunk a myth here, that says makefiles (the set of rules that make has to follow to reach the target) is only used by C/C++ developers. Wrong. Any language with a compiler/interpreter able to be invoked from the shell can use make's facilities. In fact, any project that needs dependency-based updating can use make. So an updated definition of a makefile would be a file that describes the relationships and dependencies between the files of a project, with the purpose of defining what should be updated/recompiled in case one or more files in the dependency chain changes. Understanding how make works is essential for any C developer who works under Linux or Unix - yes, commercial Unix offers make as well, although probably some version that differs from GNU make, which is our subject. "Different version" means more than numbers, it means a BSD makefile is incompatible with a GNU makefile. So make sure you have GNU make installed if you're not on a Linux box.
In the first part of this article, and some subsequent ones, we used and talked about parts of yest, a small program that displays yesterday's date by default, but does a lot of nifty date/time-related things. After working with the author, Kimball Hawkins, a small makefile was born, which is what we'll be working with.
First, let's see some basics about the makefile. The canonical name should be GNUmakefile, but if no such file exists it looks for names like makefile and Makefile, in that order, or so the manual page says. By the way, of course you should read it, and read it again, then read it some more. It's not as big as gcc's and you can learn a lot of useful tricks that will be useful later. The most used name in practice, though, is Makefile, and I have never seen any source with a file named GNUmakefile, truth be told. If, for various reasons, you need to specify another name, use make's -f, like this:
 $ make -f mymakefile 
Here's yest's Makefile, that you can use to compile and install said program, because it's not uploaded of Sourceforge yet. Although it's only two-file program - the source and the manpage - you will see make becomes useful already.
# Makefile for compiling and installing yest

UNAME := $(shell uname -s)
CC = gcc
CFLAGS = -Wall
CP = cp
RM = rm
RMFLAGS = -f
GZIP = gzip
VERSION = yest-2.7.0.5

yest:
ifeq ($(UNAME), SunOS)
        $(CC) -DSUNOS $(CFLAGS) -o yest $(VERSION).c
else
        $(CC) $(CFLAGS) -o yest $(VERSION).c
endif

all: yest install maninstall

install: maninstall
        $(CP) yest /usr/local/bin

maninstall:
        $(CP) $(VERSION).man1 yest.1
        $(GZIP) yest.1
        $(CP) yest.1.gz /usr/share/man/man1/

clean:
        $(RM) $(RMFLAGS) yest yest.1.gz

deinstall:
        $(RM) $(RMFLAGS) /usr/local/bin/yest /usr/share/man/man1/yest1.gz
If you look carefully at the code above, you will already observe and learn a number of things. Comments begin with hashes, and since makefiles can become quite cryptic, you better comment your makefiles. Second, you can declare your own variables, and then you can make good use of them. Next comes the essential part: targets. Those words that are followed by a colon are called targets, and one use them like make [-f makefile name] target_name. If you ever installed from source, you probably typed 'make install'. Well, 'install' is one of the targets in the makefile, and other commonly-used targets include 'clean', 'deinstall' or 'all'. Another most important thing is that the first target is always executed by default if no target is specified. In our case, if I typed 'make', that would have been the equivalent of 'make yest', as you can see, which means conditional compilation (if we are on Solaris/SunOS we need an extra gcc flag) and creation of an executable named 'yest'. Targets like 'all' in our example are doing nothing by themselves, just tell make that they depend on other files/targets to be up to date. Watch the syntax, namely stuff like spaces and tabs, as make is pretty pretentious about things like this.
Here's a short makefile for a project that has two source files. The filenames are src1.c and src2.c and the executable's name needs to be exec. Simple, right?
exec: src1.o src2.o
      gcc -o exec src1.o src2.o
      
src1.o: src1.c
        gcc -c src1.c
        
src2.o: src2.c
        gcc -c src2.c
The only target practically used, which is also the default, is 'exec'. It depends on src1.o and src2.o, which, in turn, depend on the respective .c files. So if you modify, say, src2.c, all you have to do is run make again, which will notice that src2.c is newer than the rest and proceed accordingly. There is much more to make than covered here, but there is no more space. As always, some self-study is encouraged, but if you only need basic functionality, the above will serve you well.

2.1.2. The configure script

Usually it's not just 'make && make install', because before those two there exists a step that generates the makefile, especially useful when dealing with bigger projects. Basically, said script checks that you have the components needed for compilation installed, but also takes various arguments that help you change the destination of the installed files, and various other options (e.g. Qt4 or GTK3 support, PDF or CBR file support, and so on). Let's see in a short glance what those configure scripts are all about.
You don't usually write the configure script by hand. You use autoconf and automake for this. As the names imply, what they do is generate configure scripts and Makefiles, respectively. For example, in our previous example with the yest program, we actually could use a configure script that detects the OS environment and changes some make variables, and after all that generates a makefile. We've seen that the yest makefile checks if we're running on SunOS, and if we are, adds a compiler flag. I would expand that to check if we're working on a BSD system and if so, invoke gmake (GNU make) instead of the native make which is, as we said, incompatible with GNU makefiles. Both these things are done by using autoconf: we write a small configure.in file in which we tell autoconf what we need to check, and usually you will want to check for more than OS platform. Maybe the user has no compiler installed, no make, no development libraries that are compile-time important and so on. For example, a line that would check the existence of time.h in the system standard header locations would look like so:
 AC_CHECK_HEADERS(time.h)
We recommend you start with a not-too-big application, check the source tarball contents and read the configure.in and/or configure.ac files. For tarballs that have them, Makefile.am is also a good way to see how an automake file looks. There are a few good books on the matter, and one of them is Robert Mecklenburg's "Managing Projects with GNU Make".

2.1.3. gcc tips and usual command-line flags

I know the gcc manual is big and I know many of you haven't even read it. I take pride in reading it all (all that pertains to IA hardware anyway) and i must confess I got a headache afterwards. Then again, there are some options you should know, even though you will learn more as you go.
You have already encountered the -o flag, that tells gcc what the resulting outfile, and -c, that tells gcc not to run the linker, thus producing what the assembler spits out, namely object files. Speaking of which, there are options that control the stages at which gcc should stop execution. So to stop before the assembly stage, after the compilation per se, use -S. In the same vein, -E is to be used if you want to stop gcc right after preprocessing.
It's a good practice to follow a standard, if not for uniformity, but for good programming habits. If you're in the formative period as a C developer, choose a standard (see below) and follow it. The C language was standardized first after Kernighan and Ritchie (RIP) published "The C Programming Language" in 1978. It was a non-formal standard, but in was shortly dubbed K&R and respected. But now it's obsolete and not recommended. Later, in the '80s and the '90s, ANSI and ISO developed an official standard, C89, followed by C99 and C11. gcc also supports other standards, like gnuxx, where xx can be 89 or 99, as examples. Check the manual for details, and the option is '-std=', "enforced" by '-pedantic'.
Warnings-related options start with "-W", like '-Wall' (it tells gcc to enable all errors, although they're not quite all enabled) or '-Werror' (treat warnings as errors, always recommended). You can pass supplemental arguments to the programs that help with the intermediary steps, such as preprocessor, assembler or linker. For example, here's how to pass an option to the linker:
 $ gcc [other options...] -Wl,option [yet another set of options...] 
Similarly and intuitively, you can use 'Wa,' for the assembler and 'Wp,' for the preprocessor. Take note of the comma and the white space that tells the compiler that the preprocessor/assembler/linker part has ended. Other useful families of options include '-g' and friends for debugging, '-O' and friends for optimization or '-Idirectory' - no white space - to add a header-containing location.

Saturday, 4 June 2016

C Programming for Embedded Systems


Embedded Software is a key element in every embedded project that is used to run the micro-controller to perform the desired operations. In our daily life, we frequently use many electronic devices such as washing machines, refrigerators, mobile phones, security system, digital camera so on which will be controlled using embedded C program. If you press a button to take a photo with your digital camera, then micro-controller will perform the functions essential to capture the image and store it. This article presents basics of embedded systemsmicro-controller consists of many ports toconstruct the embedded C programming tutorial.

7-Steps to Building Embedded C Programming Tutorial

The embedded C programming is a collection of one or more functions. Every function is a collection of statements that are used to perform some specific tasks. The embedded C programming tutorial is similar to a C language is constructed with some basic elements such as character set, variables, constants, data types, keywords, variable declaration, statements, expressions etc. that are used to write the program easily. However, we are providing 7-steps with embedded C programming tutorial to easily write the program such as:
  1. Comments
  2. Preprocessor directives
  3. Port configuration
  4. Global variables
  5. main() function or core function
  6. Variable declaration
  7. Program Logic
7 Steps to Build Embedded C Programming Tutorial

Step1: Comments

The comments are important to the programming languages which describes function of program. Comments are non-executable code that is used to provide documentation to the program. The comments make an easy way to understand function of the program. There are two types of comments in embedded C programming tutorial such as:
  • Single Line Comment
  • Double Line Comment or Multi Line Comment

Single Line Comment

Generally single line comments are useful for the programming languages that can be used to explain a part of the code. The single line comments starts with double slash(//) which can be placed anywhere in the program. Single line comments are used to ignore complete line in a program.
Single Line Comment
Single Line Comment

Multi Line Comment

The multi line comments starts with single slash and an asterisk (/*) that can be used to explain a block of code. The multi line comments can be placed any where in the program. The multi line comments are used to ignore a complete block of code in a program.
Multi Line Comment
Multi Line Comment

Step2: Processor Directives

Preprocessor directives are lines integrated in the code of programs which can be followed by a hash sign (#). These lines are not programmed statements, but directives for the preprocessor. The preprocessor inspects the code before actual compilation of code begins and resolves all these directives before any code is actually generated by regular statements. Even though there are many different preprocessor directives, but two directives are very useful in the embedded C programming tutorial such as
  • #include
  • #define
P2Which can be called as a header file, containing C declarations and macro definitions to be shared between several source files. The #include directive is normally used to include standard library such as study. h that can be used to access I/O functions from the C library. The #define directive normally used to define the string of variables and to assign the values by performing the operations in a single instruction it can be defined as macros.

Step 3:Port Configuration

In every micro-controller consists of many ports, each port contains many pins which can be used to control the interfacing devices. These pins are declared in a program using keywords. The embedded C has consist standard and predefined keywords such as bit, sbit, SFR which can be used to declare the single pin and bits in a program.
Port Configuration
Port Configuration

sbit:

This data type is used in case of accessing a single bit of SFR register.
  • Syntax: sbit variable name = SFR bit ;
  • Ex: sbit a=P2^1;
  • Explanation: If we assign p2.1 as ‘a’ variable, then we can use ‘a’ instead of p2.1 anywhere in the program, which reduces the complexity of the program.

Bit:

This data type is used for accessing the bit addressable memory of RAM (20h-2fh).
  • Syntax: name of bit variable;
  • Ex: bit c;
  • Explanation: It is a bit sequence setting in a small data area that is used by a program to remember something.

SFR:

This data type is used to get the SFR register peripheral pots by another name. All the SFR registers must be declared with capital letters.
  • Syntax: SFR variable name = SFR address of SFR register;
  • Ex: SFR port0=0×80;
  • Explanation: If we assign 0×80 as ‘port0’, then we can use 0×80 instead of port0 anywhere in the program, which reduces the complexity of the program.

SFR Register:

‘Special Function Register’ is represented as SFR register. Microcontroller 8051 has 256 bytes of RAM memory, which is separated into two parts: the first part of 128 bytes is used for data storage, and the other of 128 bytes is used to SFR registers. All peripheral devices like timers and counters, I/O ports are stored in the SFR register, and each element has a unique address.

Step4: Global Variables

The variable declared before the main function is called a global variable, that can be accessed on any function in the program. The life time of the global variable depends on the program until program comes to an end.

Step5: Main Function or Core Function

The main function is a core of every program execution, starts with main function only. Every program uses only one main function because if program contains more than one main function, then the compiler will get confused where to start the program execution.
Main Fucntion
Main Fucntion

Step6: Variable Declaration

The variable is a name that can be used to store the values. That variable must be declared before used in the program. The declaration of a variable specifies its name and data type. The storage representation of data is called data type. The embedded C programming uses four basic data types such as float, integer, character, etc. used to store the data in the memory. The size and range of data type defined based on compiler.
Variable Declaration

Step7: Program Logic

The plan of path is called a program logic that presents the theory behind and expected outcomes of a program’s actions. It describes the assumption or theory about why the program will work, showing the acknowledged effects of activities or resources.
Program Logic
Program Logic

LED flash light Program

LED flash light Program
Hope this article gives basic information to the beginners of embedded C programming. Good understanding of the Embedded C programming is most essential for designing embedded based projects. We encourage and welcome queries, suggestions and comments from our readers. Therefore, you can post your queries and feedback about this article in the comments section given below.

C Programming for Embedded System

Introduction

Now for embedded system development people are using operating system to add more features and at the same time reduce the development time of a complex system. This article gives a simple & understandable overview of scheduling technique of embedded system programming for beginners and intermediate programmers. I am considering “C” as the programming language and an application running in a dedicated hardware/device without operating system. The binary output (*.bin file) can be directly running from the device after Power on. In this case, the time scheduling is an important part of system development. We should ensure that the right task should execute at the right time.

What is Embedded System?

An embedded system is some combination of computer hardware and software, either fixed in capability or programmable - it is specifically designed for a particular kind of application device. Or in short we can say, an embedded system is a special-purpose computer system designed to perform one or a few dedicated functions.
All embedded systems need not be a real time system. Real Time systems are those in which timeliness is as important as the correctness of the outputs. Performance estimation and reduction are crucial in real time system. By definition, we can say a real time system is a system that must satisfy explicit (bounded) response time constraints or risk severe consequences, including failure.
Embedded system plays an important part in our daily lives. Most of the people around the globe are highly dependent on different types of gadgets like mobile phones, iPods and many more. The embedded systems used in industrial machines, automobiles, medical equipment, airplanes, and vending machines have to be real time.
I thought of sharing my experience in Embedded systems. This is my first ever article on CodeProject, so I am expecting your valuable feedback and suggestions for betterment.

Background

People are using operating system (RTOS) for complex devices to make it more flexible, add more features and minimize the development time. But it will increase the cost of the device for a small application. So for small application firmware development without operating system is very much popular.
Time scheduling is an important aspect of real-time system. Real time software are executed in response to external events. This event may be periodic, in which case an appropriate scheduling of events and related task is required to guarantee performance. The scheduling strategy also depends on scheduling facilities that the chosen RTOS offers. This article emphasis on the event based technique when there was no operating system running in the device.

Scheduling

Two kinds of scheduling techniques are used in Real-Time system:
  1. Static Scheduling
  2. Dynamic Scheduling

Static Scheduling

This involves analyzing the tasks statically and determining their timing properties. This timing property can be used to create a fixed scheduling table, according to which tasks will be dispatched for execution at run time. Thus the order of execution of the task is fixed, and it is assumed that their execution time is also fixed.

Round-Robin Scheduling

Round Robin scheduling by Time Slicing is one of the ways to achieve static scheduling. Round robin is one of the simplest and most widely used scheduling algorithms; in which a small unit of time known as time slice is defined. Schedulers go around the queue of ready-to-run processes and allocate a time slice to each such process.

Scheduling with Priority

Priority indicates the urgency or importance assigned to a task. There are two approaches of scheduling based on priority based execution – when the processor is idle, the ready task with the highest priority is chosen for execution; once chosen, the task is run to completion.

Pre-Emptive Scheduling

Preemptive Priority based execution is when the processor is idle, the ready task with highest priority is chosen for execution; at any time, the execution of a task can be preempted if a task of higher priority becomes ready. Thus, at all times, the processor is idle or executing the ready task with the highest priority.

Dynamic Scheduling

Another kind of scheduling mechanism is known as Dynamic Scheduling – In this case, a real-time program requires a sequence of decisions to be taken during execution of the assignment of resource to transactions. Here each decision must be taken without prior knowledge of the needs of future tasks. Dynamic scheduling is not in the scope of this article, so I am not discussing it in detail here. Perhaps we can discuss it in another article.

Code Snippet

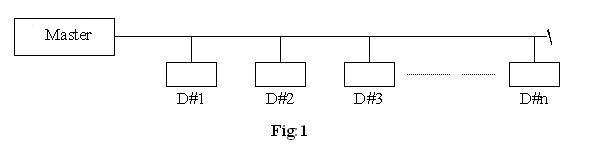
Let us take a example of a Master-Slave communication system. Master system is connected to n number of slave systems over serial port (RS 485 network) in multi-drop architecture. Figure 1 shows the typical configuration of this system. Here only one system can talk at a time and others are in listen mode. The Master controls the communication.
Typical Communication Gateway

Main Routine

void main(void)
{
    /* Initialise all register of processor and the peripheral devices */
    InitMain();

    /* Register the event handler */
    RegisterTask(MainEventHandler);

    RegisterTask(CheckDataIntegrity);
    ..............

    /* Turn on all the leds for 1 sec as lamp test */
    TurnOnLed(LED, 1000);

    /* Call the application event manager - no return */
    EventManager();
}
In the above case, the RegisterTast() and EventManager() are two important functions. For any application, we have number of tasks and a function represents the entry point of a task, like 'CheckDataIntegrity' . When a device receives a complete data packet, it goes for data checking. RegisterTask() function creates a link-list of function pointers where each node represents a single task. Here I have passed the function pointerMainEventHandler or CheckDataIntegrity as an argument.
Main.h should have the following lines:
/* Application event handler function pointer */
typedef void (*tEventHandler)(unsigned short *);

/* Link-list definition */
typedef struct TaskRecord
{
    tEventHandler EventHandler;
    struct TaskRecord *pNext;
}tTaskRecord;

static tTaskRecord *mpTaskList = NULL;
Here mpTaskList represents a link-list of function pointers. Considering each node of link list as a entry point of a task, this will execute one by one in EventManager() function. Below is the definition of RegisterTask()function which adds the function pointer into the link-list.
void RegisterTask(tEventHandler EventHandlerFunc)
{
    tTaskRecord *pNewTask;

    /* Create a new task record */
    pNewTask = malloc(sizeof(tTaskRecord));
    if(pNewTask != NULL)
    {
        /* Assign the event handler function to the task */
        pNewTask->EventHandler = EventHandlerFunc;
        pNewTask->pNext = NULL;

        if(mpTaskList == NULL)
        {
            /* Store the address of the first task in the task list */
            mpTaskList = pNewTask;
        }
        else
        {
            /* Move to the last task in the list */
            mpActiveTask = mpTaskList;
            while(mpActiveTask->pNext != NULL)
            {
                mpActiveTask = mpActiveTask->pNext;
            }

            /* Add the new task to the end of the list */
            mpActiveTask->pNext = pNewTask;
        }
    }
}
For this type of application, after initialization there should be an infinite loop for continuous execution. The function EventManager() at the end of the main which is nothing but a infinite loop always checks for active tasks or events. If any event occurs, then it passes that event flag as an argument of the function which is already added into the mpTaskList. So EventManager() function calls MainEventHandler() function with eventIDas an argument. MainEventHandler will check the eventId and do the necessary action or execute the corresponding code. Here the event should be unique for each event-handler function, i.e. two event-handler functions should not check the same eventID.

Definition of EventManager Function

void EventManager(void)
{
    unsigned short AllEvents;
    tTaskRecord pActiveTask

    /* No return */
    while(1)
    {
        /* Read application events */
        AllEvents = mEventID;

        /* Process any application events */
        pActiveTask = mpTaskList;
        while((AllEvents != 0) && (pActiveTask != NULL))
        {
            if(pActiveTask->EventHandler != NULL)
            {
                /* Call the task's event handler function */
                (mpActiveTask->EventHandler)(&AllEvents);

                /* Read application events */
                AllEvents = mEventID;
            }

            /* Move to the next event handler */
            pActiveTask = pActiveTask->pNext;
        }
    }
}
Event can be generated from interrupt service routine or by checking the status of an input pin in polling mode.SerialReceiveISR function generates an event after receiving the complete packet. Since the variablemEventID is modified in the interrupt service routine, it is recommended to disable interrupt while reading.
#pragma interrupt_level 0
void interrupt IService(void)
{
    /* Receive bit is set when a byte is received */
    if(Receivebit == 1)
    {
        SerialReceiveISR()
    }
    ...........
    /* code for other interrupt */
}

SerialReceiveISR Function

#pragma inline SerialReceiveISR
void SerialReceiveISR(void)
{    
    static char RxMsgDataCount;
    
    /* If a framing or overrun error occurs then clear the error */
    if(Error == 1)
    {
        /* Indicate a problem was seen */
        mEventID = mEventID | ATTENTION_REQ_FLG;
    }
    else if( RxMsgCount == DataLength)
    {
        /* Packet receive complete */
        mEventID = mEventID | DATA_RECEIVE_COMPLETE;
    }
    else
    {
        /* Store data in memory */
        Store(RxByte);
        RxMsgCount++;
    }
}
Here ATTENTION_REQ_FLAG & DATA_RECEIVE_COMPLETE flags are two bits of a Global variable mEventID, which is 16 bits and each bit triggers the corresponding event when set.
#define ATTENTION_REQ_FLAG  0x0008
#define DATA_RECEIVE_COMPLETE  0x0001
When the flag is set, the EventManager will call all the registered functions with the eventID as argument.
void MainEventHandler(unsigned short *Event)
{
    if(*Event & DATA_RECEIVE_COMPLETE)
    {
        /* Do the corresponding action */
        .........
        /* Reset the flag */
        *Event &= ~DATA_RECEIVE_COMPLETE; 
    }
}
Now we can change the variable type to increase the number of flags. If you want to generate multiple number of events, then use a structure rather than a single variable.